 Max Gibson
Gantry No.1 · Concrete House Gantry
A DIY on-site portal gantry that prints concrete walls over a foundation footprint — sized for an ADU / small Louisiana house first, expandable toward the Lot 6 Sundown Dr house. Not the Bambu X2D filament printers (those are shop tooling).
Concept only. Not certified engineering. A licensed structural engineer must review the frame, footings and any printed wall; printed walls need a permit path under the Louisiana State Uniform Construction Code (IRC Appendix AW / ICC 1150 / UL 3401 references). Prices are Oct 2026 USD estimates; nothing has been purchased.
Build stages (3D)
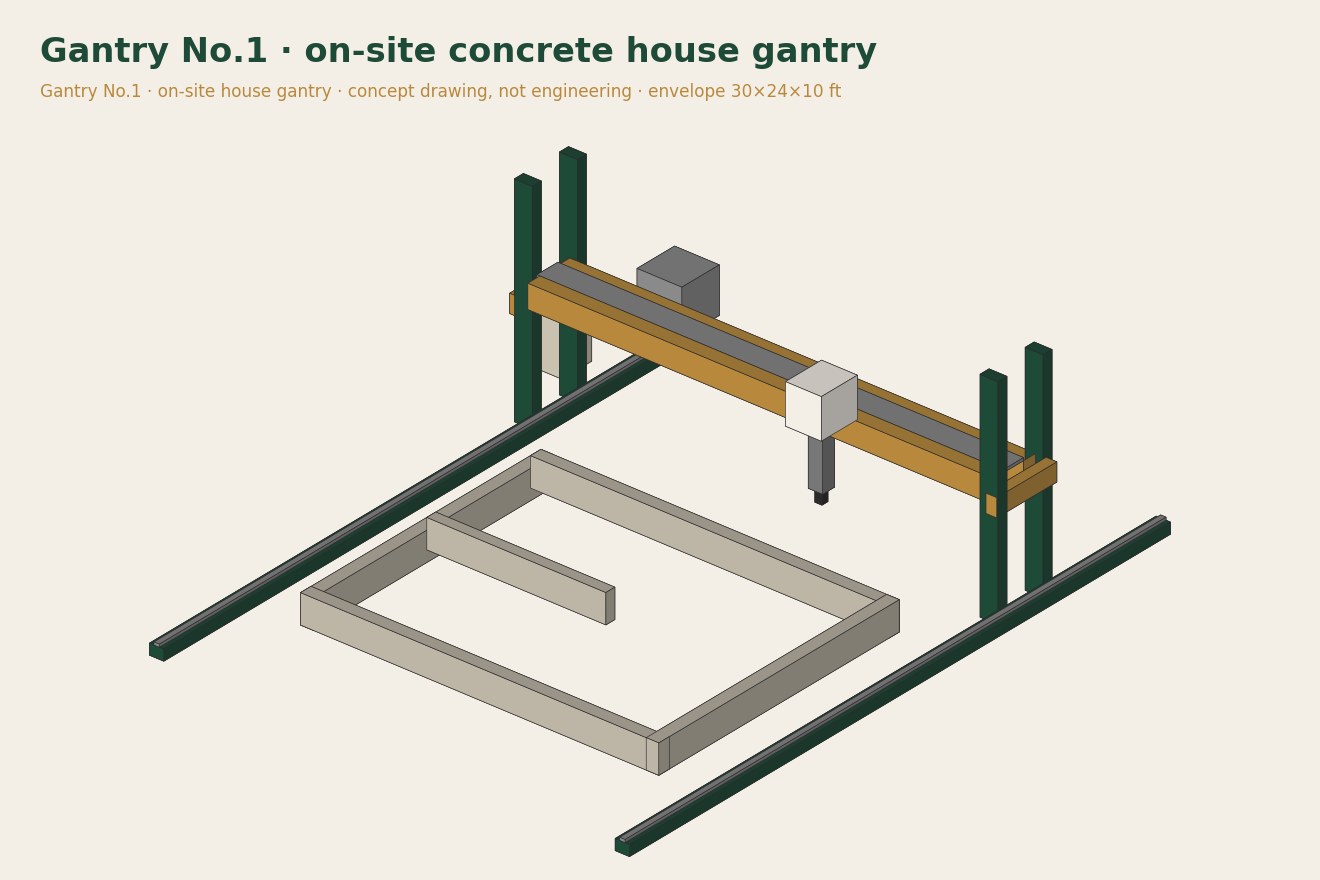
Concept drawing — not engineering.
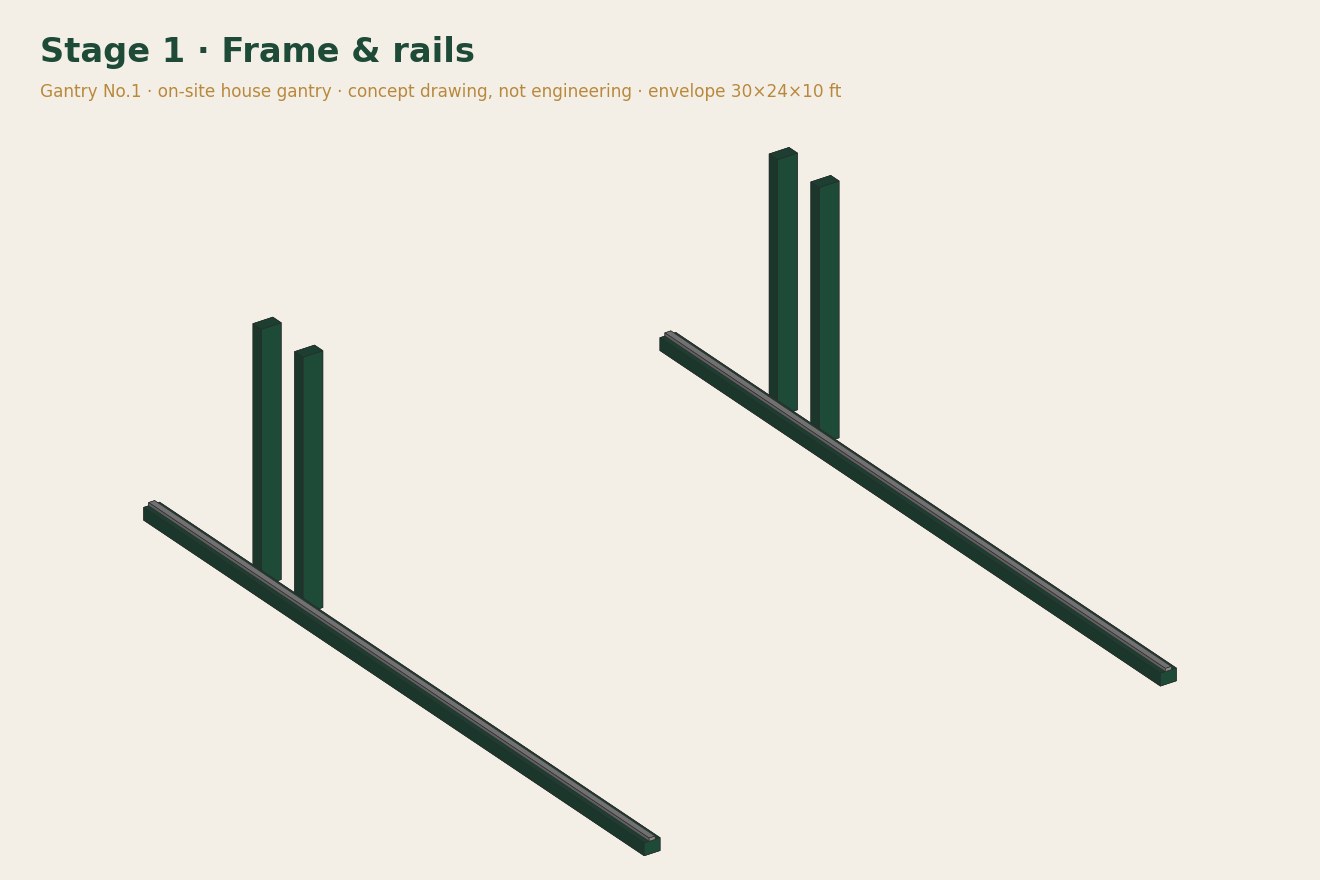
Concept drawing — not engineering.
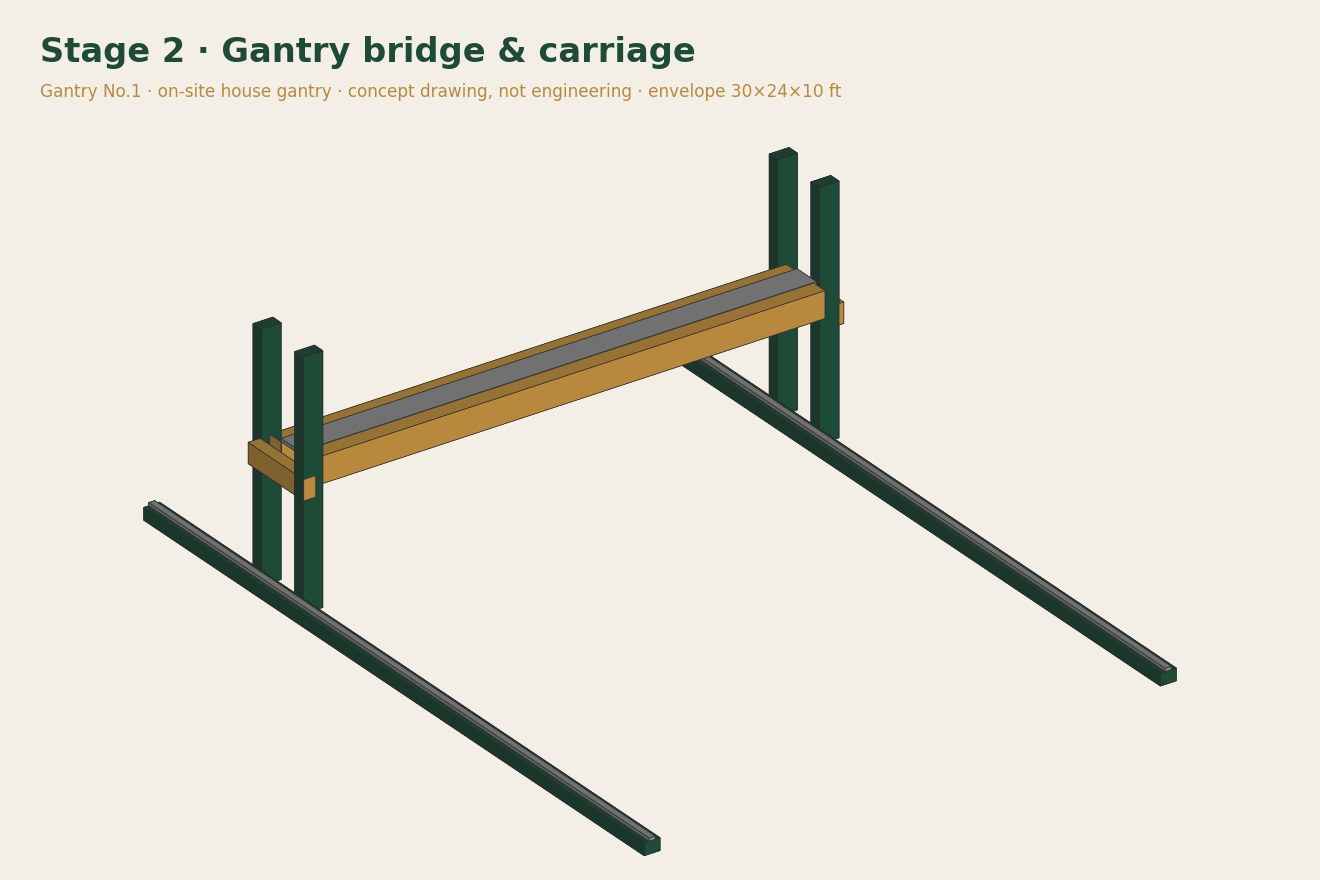
Concept drawing — not engineering.
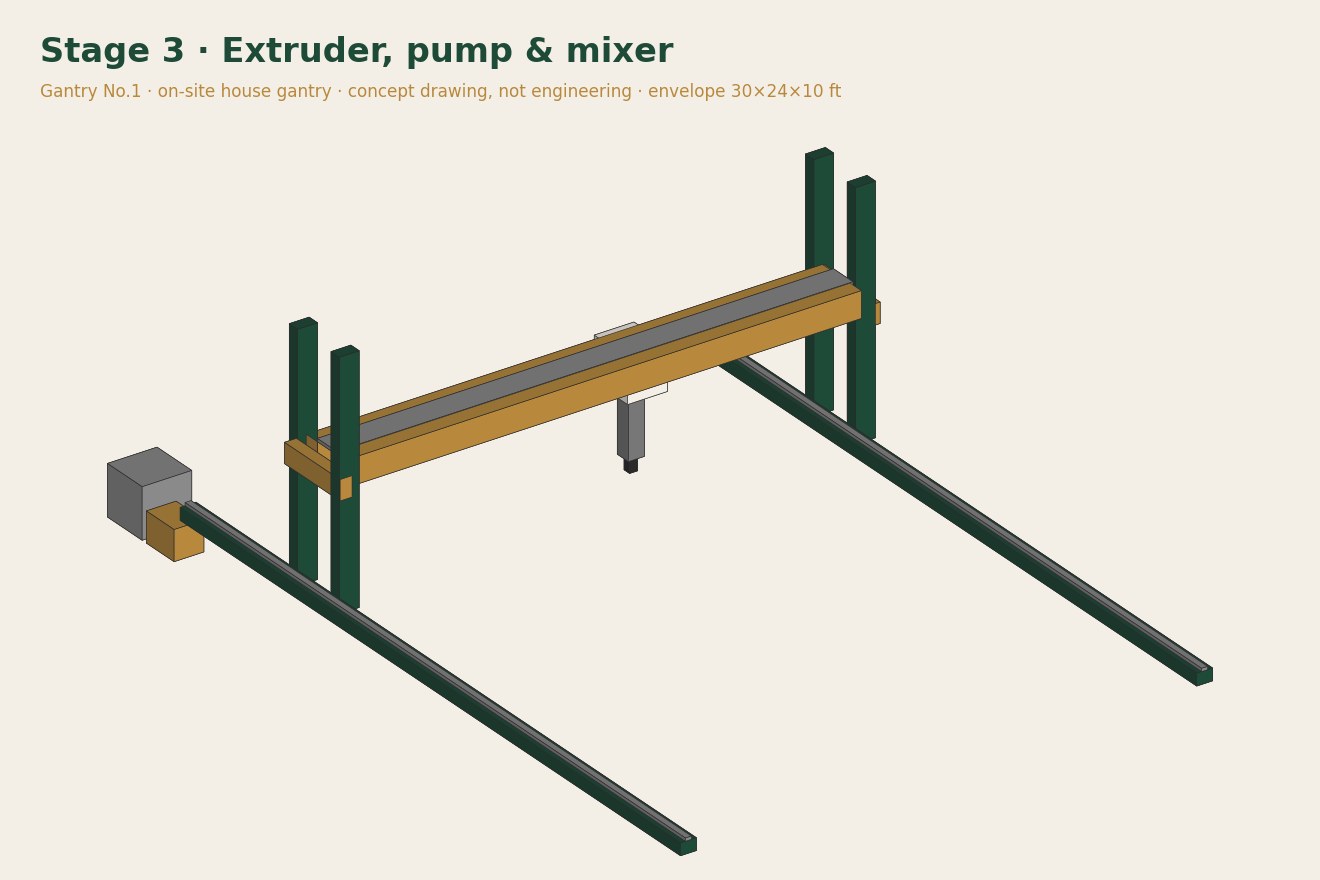
Concept drawing — not engineering.
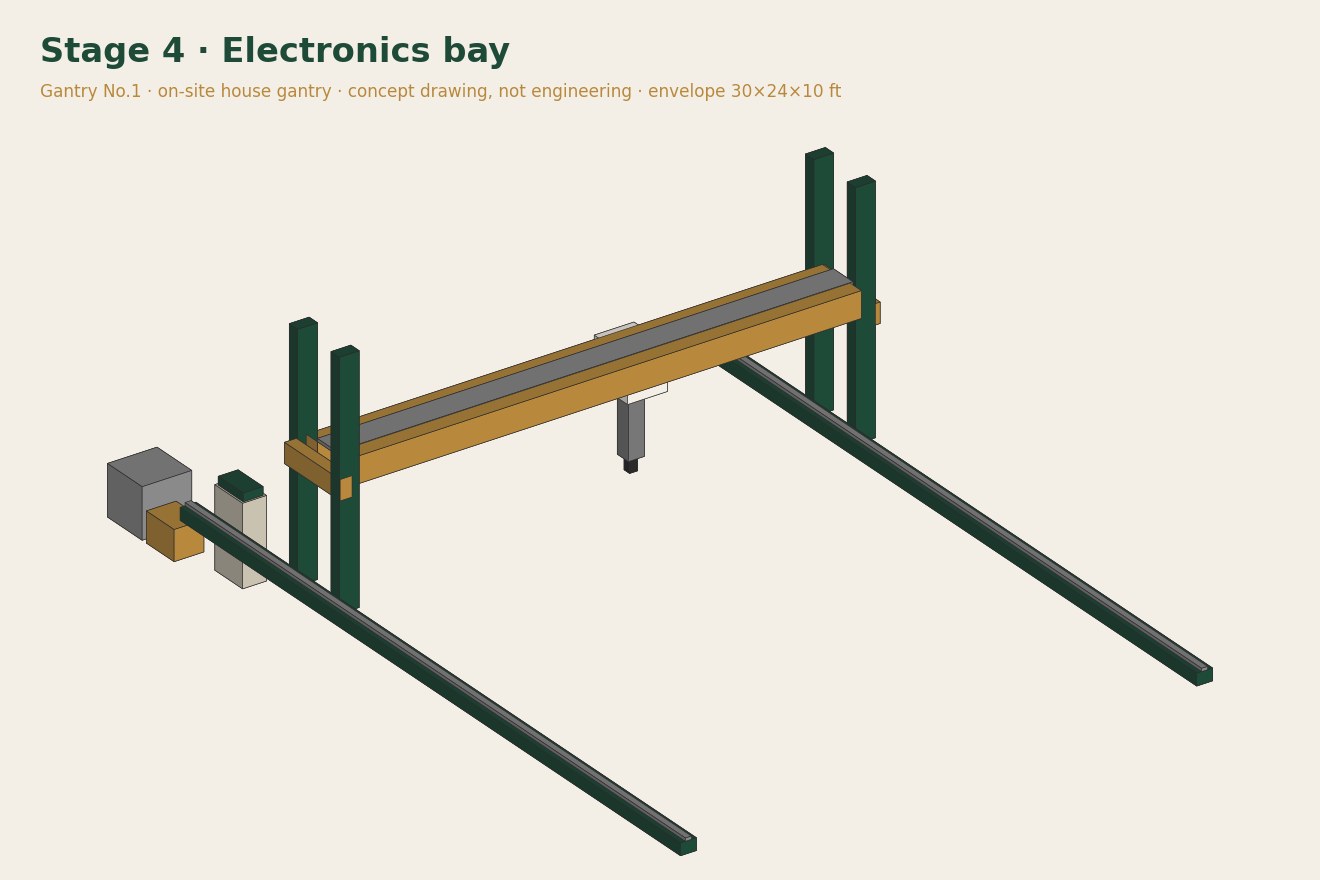
Concept drawing — not engineering.
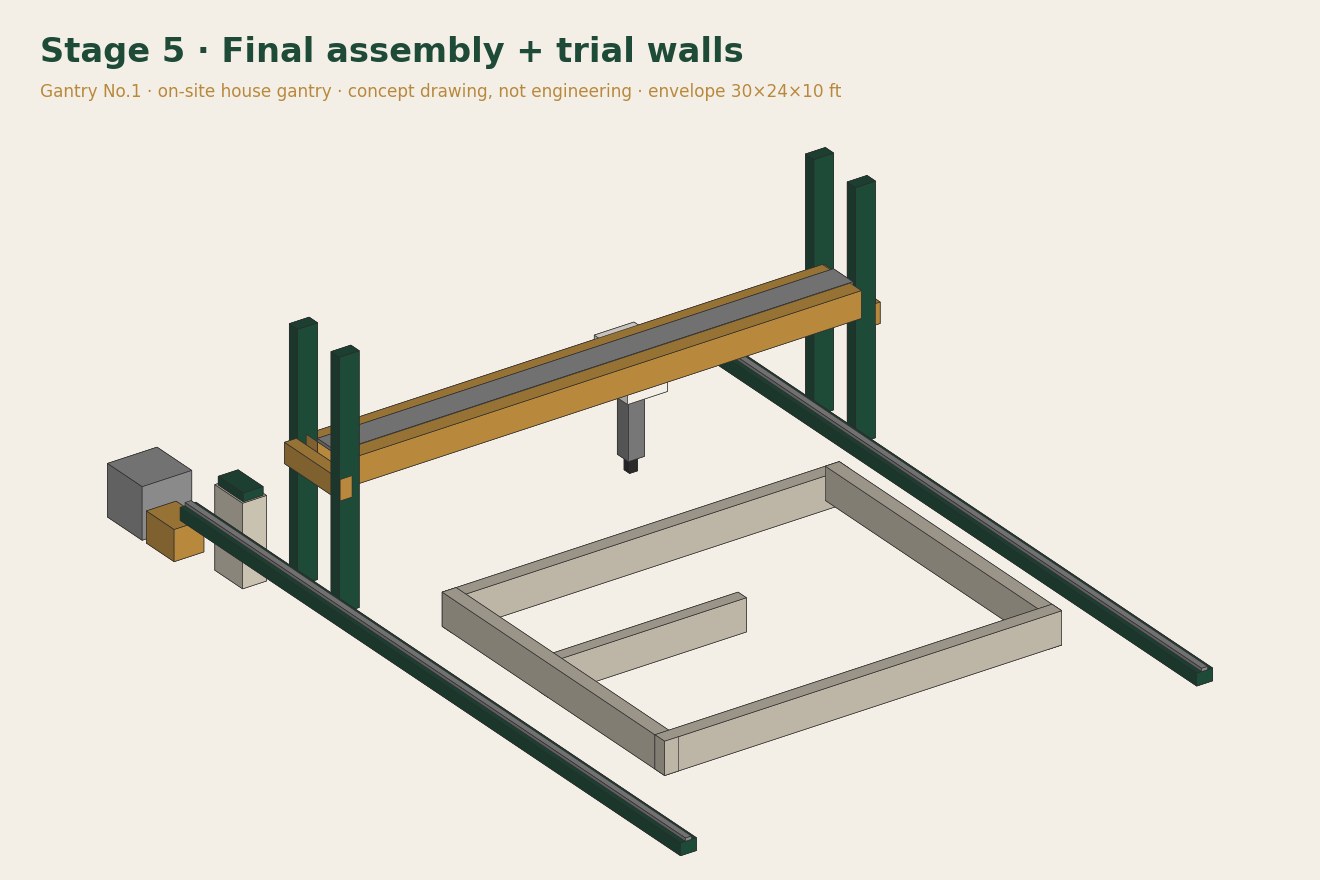
Concept drawing — not engineering.
Design
| Item | Value |
|---|---|
| Architecture | Portal (bridge) gantry on ground rails, COBOD-style; bridge rides 4 towers |
| Print envelope | 30 ft (Y, along rails) × 24 ft (X, bridge) × 10 ft (Z) |
| Rail footprint | 36 ft × 26 ft rail centers; Y extends in 12 ft rail modules |
| Frame | A36/A500 steel: W6×15 rail beds, HSS 6×6 towers, twin HSS 8×4 bridge |
| Motion | Rack & pinion Mod 2 on X and dual-Y (10:1 planetary); Tr40 lead screws Z on 4 towers |
| Motors | 8× NEMA34 12 N·m closed-loop steppers (X, Y1, Y2, Z×4, auger) |
| Material path | Paddle mixer → progressive-cavity mortar pump (VFD) → 1.25" hose → hopper → print-head auger → 30–50 mm nozzle |
| Mix | Fine printable mortar (sand ≤4 mm) + accelerator; no coarse aggregate for PC pump |
| Controller | Klipper on Pi 5 + BTT Octopus Pro, step/dir to external drivers; Z_TILT for 4 Z |
| Speed target | 100–150 mm/s print, ~1 in layers, 40 mm bead |
| Est. cost | ~$29,340 (Oct 2026 USD, ±25%) |
Step-by-step
Stage 1 · Frame & rails
- Stake the 2 rail lines, 26 ft apart, 36 ft long, square by 3-4-5.Part G1: Concrete pier/strip footings for rails, 2× 36 ft runs (bagged 80 lb mix) ×60 · ~$480 · Buy: Local yard / Home Depot
- Pour continuous strip footings with J-bolts every 4 ft.Part G1: Concrete pier/strip footings for rails, 2× 36 ft runs (bagged 80 lb mix) ×60 · ~$480 · Buy: Local yard / Home Depot
- Set rebar and anchor bolts before the pour.Part G3: Rebar #4 ×20 ft + anchor bolts 5/8×12 J-bolts (footings) ×1 · ~$350 · Buy: Amazon search
- Grout the W6 rail beds level to ±1/16" over the full run.Part G2: W6×15 steel beam, 20 ft (rail beds, 2 per side, spliced) ×4 · ~$2,200 · Buy: Metal yard quote
- Bolt the HGR25 Y rails to the beam tops.Part G4: Hardened linear rail 25 mm (HGR25) 4 m sections + blocks, Y axis ×8 · ~$1,600 · Buy: Amazon search
- Bolt the Mod 2 rack alongside each Y rail; check tooth pitch at every joint.Part G5: Gear rack Mod 2 helical/straight 1 m, Y axis (both sides) ×22 · ~$900 · Buy: Amazon search
- Cut four 12 ft towers from HSS 6×6.Part G6: HSS 6×6×1/4 square tube 20 ft (4 towers, 12 ft each) ×3 · ~$1,350 · Buy: Metal yard quote
- Weld base plates and gussets to each tower.Part G7: Tower base plates 3/4" 16×16 + gusset plate stock ×1 · ~$450 · Buy: Metal yard quote
- Tack, square, then fully weld each tower.Part G34: Welding consumables (E70S-6 wire, discs) — shop welder assumed ×1 · ~$300 · Buy: Amazon search
- Bolt tower bases to the Y-rail trucks (stand-in until Stage 2).Part G8: Grade 8 bolts/nuts/washers kit 5/8" & 1/2" ×1 · ~$180 · Buy: Amazon search
Stage 2 · Gantry carriage
- Weld the twin HSS 8×4 bridge beams with 6 cross ties.Part G9: HSS 8×4×1/4 tube 30 ft (bridge beam, pair) ×2 · ~$1,900 · Buy: Metal yard quote
- Bolt the X linear rail to the bridge top flange.Part G10: Linear rail HGR25 3 m + blocks, X axis on bridge ×3 · ~$550 · Buy: Amazon search
- Bolt the X rack beside the X rail.Part G11: Gear rack Mod 2 1 m, X axis ×9 · ~$370 · Buy: Amazon search
- Cut and drill the four bridge-truck plates.Part G15: 1/2" steel plate carriage blanks (bridge trucks, X carriage) ×1 · ~$400 · Buy: Metal yard quote
- Mount Y-truck linear blocks under each tower foot.Part G4: Hardened linear rail 25 mm (HGR25) 4 m sections + blocks, Y axis ×8 · ~$1,600 · Buy: Amazon search
- Mount a Tr40 Z screw inside each tower.Part G13: Trapezoidal lead screw Tr40×7 3.2 m + bronze nut (Z, one per tower) ×4 · ~$1,600 · Buy: Amazon search
- Fit top thrust bearing and bottom pillow block on each Z screw.Part G14: Pillow-block & thrust bearings for Z screws ×8 · ~$320 · Buy: Amazon search
- Bolt bronze Z nuts to the bridge end plates.Part G13: Trapezoidal lead screw Tr40×7 3.2 m + bronze nut (Z, one per tower) ×4 · ~$1,600 · Buy: Amazon search
- Fit pinion + gearbox on Y1, Y2 and X drive mounts.Part G12: Mod 2 pinion 20T + 10:1 planetary gearbox (NEMA34) ×4 · ~$1,000 · Buy: Amazon search
- Hang drag chains on Y (both sides) and X.Part G16: Heavy cable/drag chain 45×100 mm, 10 m ×3 · ~$450 · Buy: Amazon search
Stage 3 · Extruder & pump
- Build the X carriage plate with 4 linear blocks.Part G15: 1/2" steel plate carriage blanks (bridge trucks, X carriage) ×1 · ~$400 · Buy: Metal yard quote
- Mount the auger barrel vertically on the carriage.Part G20: Print head auger: NEMA34 + 15:1 gearbox + 40 mm auger in steel barrel ×1 · ~$650 · Buy: Amazon search
- Fit the hopper/accumulator over the auger inlet.Part G22: Hopper/accumulator 5 gal with level sensor ×1 · ~$180 · Buy: Amazon search
- Thread a 40 mm round nozzle on for first tests.Part G21: Nozzles 30/40/50 mm round + 40×20 flat (machined/printed) ×1 · ~$150 · Buy: McMaster
- Place mixer and pump on the slab outside the envelope.Part G18: Forced-action paddle mortar mixer 6–9 cu ft ×1 · ~$1,800 · Buy: Amazon search
- Connect pump to hopper with 1.25" hose run along the drag chain.Part G19: Mortar hose 1.25" × 50 ft w/ cam-locks ×2 · ~$500 · Buy: Amazon search
- Wire the pump motor to the VFD.Part G23: VFD 3 HP 240 V single-phase in (pump speed control) ×1 · ~$350 · Buy: Amazon search
- Run water, then grout slurry, through the pump to check for leaks.Part G17: Progressive cavity mortar pump, 2–3 HP, 10–20 L/min (spray/grout type) ×1 · ~$4,200 · Buy: Amazon search
Stage 4 · Electronics bay
- Mount the NEMA 4X enclosure on the tower nearest the mixer.Part G27: NEMA 4X enclosure 36×30×12, fan/filter, DIN rail ×1 · ~$550 · Buy: Amazon search
- Fit DIN rail, power supplies and fan filter.Part G26: 72 V / 48 V DIN power supplies (motion), 24 V logic PSU ×3 · ~$450 · Buy: Amazon search
- Mount the 8 closed-loop drivers.Part G24: NEMA34 closed-loop stepper 12 N·m + driver (X, Y1, Y2, Z×4, auger) ×8 · ~$3,200 · Buy: Amazon search
- Mount Octopus Pro + Pi 5; flash Klipper.Part G25: BigTreeTech Octopus Pro (step/dir out) + Raspberry Pi 5 (Klipper) ×1 · ~$260 · Buy: Amazon search
- Wire step/dir from Octopus to each external driver.Part G24: NEMA34 closed-loop stepper 12 N·m + driver (X, Y1, Y2, Z×4, auger) ×8 · ~$3,200 · Buy: Amazon search
- Wire the E-stop loop through the safety relay to the motion contactor.Part G28: Safety: E-stop loop (4 mushroom buttons), safety relay, contactor ×1 · ~$380 · Buy: Amazon search
- Install home/limit switches on every axis.Part G29: Inductive limit/home switches + pendant/touchscreen ×1 · ~$220 · Buy: Amazon search
- Pull shielded motor cable through the drag chains.Part G30: Shielded motor cable 4×14 AWG + flex control cable, 300 ft ×1 · ~$700 · Buy: Amazon search
- Configure Klipper: dual-Y gantry, 4-motor Z with Z_TILT.Part G25: BigTreeTech Octopus Pro (step/dir out) + Raspberry Pi 5 (Klipper) ×1 · ~$260 · Buy: Amazon search
Stage 5 · Final assembly
- Lift the bridge onto the four towers with a rented telehandler.Part G31: Rented telehandler/skid steer day (erect bridge) — rent only ×1 · ~$450 · Buy: Local rental
- Engage all four Z nuts and level the bridge.Part G13: Trapezoidal lead screw Tr40×7 3.2 m + bronze nut (Z, one per tower) ×4 · ~$1,600 · Buy: Amazon search
- Mount the X/Y/Z motors and connect cables.Part G24: NEMA34 closed-loop stepper 12 N·m + driver (X, Y1, Y2, Z×4, auger) ×8 · ~$3,200 · Buy: Amazon search
- Home all axes slowly at 10% speed with spotters on E-stops.Part G28: Safety: E-stop loop (4 mushroom buttons), safety relay, contactor ×1 · ~$380 · Buy: Amazon search
- Dry-run a wall toolpath with no material.Part G25: BigTreeTech Octopus Pro (step/dir out) + Raspberry Pi 5 (Klipper) ×1 · ~$260 · Buy: Amazon search
- Mix a trial batch with accelerator admixture.Part G33: Test mix: Portland cement + masonry sand + admixture (1 trial wall) ×1 · ~$600 · Buy: Amazon search
- Print a 4 ft trial wall to 3 ft high; record layer time.Part G18: Forced-action paddle mortar mixer 6–9 cu ft ×1 · ~$1,800 · Buy: Amazon search
- Cover the machine and stage PPE before every print.Part G32: Weather tarp/frame cover + PPE (silica respirators, gloves, glasses) ×1 · ~$300 · Buy: Amazon search
Bill of materials
| ID | Stage | Part | Qty | Price | Buy |
|---|---|---|---|---|---|
| G1 | Stage 1 | Concrete pier/strip footings for rails, 2× 36 ft runs (bagged 80 lb mix) | 60 | ~$480 | Local yard / Home Depot |
| G2 | Stage 1 | W6×15 steel beam, 20 ft (rail beds, 2 per side, spliced) | 4 | ~$2,200 | Metal yard quote |
| G3 | Stage 1 | Rebar #4 ×20 ft + anchor bolts 5/8×12 J-bolts (footings) | 1 | ~$350 | Amazon search |
| G4 | Stage 1 | Hardened linear rail 25 mm (HGR25) 4 m sections + blocks, Y axis | 8 | ~$1,600 | Amazon search |
| G5 | Stage 1 | Gear rack Mod 2 helical/straight 1 m, Y axis (both sides) | 22 | ~$900 | Amazon search |
| G6 | Stage 1 | HSS 6×6×1/4 square tube 20 ft (4 towers, 12 ft each) | 3 | ~$1,350 | Metal yard quote |
| G7 | Stage 1 | Tower base plates 3/4" 16×16 + gusset plate stock | 1 | ~$450 | Metal yard quote |
| G8 | Stage 1 | Grade 8 bolts/nuts/washers kit 5/8" & 1/2" | 1 | ~$180 | Amazon search |
| G9 | Stage 2 | HSS 8×4×1/4 tube 30 ft (bridge beam, pair) | 2 | ~$1,900 | Metal yard quote |
| G10 | Stage 2 | Linear rail HGR25 3 m + blocks, X axis on bridge | 3 | ~$550 | Amazon search |
| G11 | Stage 2 | Gear rack Mod 2 1 m, X axis | 9 | ~$370 | Amazon search |
| G12 | Stage 2 | Mod 2 pinion 20T + 10:1 planetary gearbox (NEMA34) | 4 | ~$1,000 | Amazon search |
| G13 | Stage 2 | Trapezoidal lead screw Tr40×7 3.2 m + bronze nut (Z, one per tower) | 4 | ~$1,600 | Amazon search |
| G14 | Stage 2 | Pillow-block & thrust bearings for Z screws | 8 | ~$320 | Amazon search |
| G15 | Stage 2 | 1/2" steel plate carriage blanks (bridge trucks, X carriage) | 1 | ~$400 | Metal yard quote |
| G16 | Stage 2 | Heavy cable/drag chain 45×100 mm, 10 m | 3 | ~$450 | Amazon search |
| G17 | Stage 3 | Progressive cavity mortar pump, 2–3 HP, 10–20 L/min (spray/grout type) | 1 | ~$4,200 | Amazon search |
| G18 | Stage 3 | Forced-action paddle mortar mixer 6–9 cu ft | 1 | ~$1,800 | Amazon search |
| G19 | Stage 3 | Mortar hose 1.25" × 50 ft w/ cam-locks | 2 | ~$500 | Amazon search |
| G20 | Stage 3 | Print head auger: NEMA34 + 15:1 gearbox + 40 mm auger in steel barrel | 1 | ~$650 | Amazon search |
| G21 | Stage 3 | Nozzles 30/40/50 mm round + 40×20 flat (machined/printed) | 1 | ~$150 | McMaster |
| G22 | Stage 3 | Hopper/accumulator 5 gal with level sensor | 1 | ~$180 | Amazon search |
| G23 | Stage 3 | VFD 3 HP 240 V single-phase in (pump speed control) | 1 | ~$350 | Amazon search |
| G24 | Stage 4 | NEMA34 closed-loop stepper 12 N·m + driver (X, Y1, Y2, Z×4, auger) | 8 | ~$3,200 | Amazon search |
| G25 | Stage 4 | BigTreeTech Octopus Pro (step/dir out) + Raspberry Pi 5 (Klipper) | 1 | ~$260 | Amazon search |
| G26 | Stage 4 | 72 V / 48 V DIN power supplies (motion), 24 V logic PSU | 3 | ~$450 | Amazon search |
| G27 | Stage 4 | NEMA 4X enclosure 36×30×12, fan/filter, DIN rail | 1 | ~$550 | Amazon search |
| G28 | Stage 4 | Safety: E-stop loop (4 mushroom buttons), safety relay, contactor | 1 | ~$380 | Amazon search |
| G29 | Stage 4 | Inductive limit/home switches + pendant/touchscreen | 1 | ~$220 | Amazon search |
| G30 | Stage 4 | Shielded motor cable 4×14 AWG + flex control cable, 300 ft | 1 | ~$700 | Amazon search |
| G31 | Stage 5 | Rented telehandler/skid steer day (erect bridge) — rent only | 1 | ~$450 | Local rental |
| G32 | Stage 5 | Weather tarp/frame cover + PPE (silica respirators, gloves, glasses) | 1 | ~$300 | Amazon search |
| G33 | Stage 5 | Test mix: Portland cement + masonry sand + admixture (1 trial wall) | 1 | ~$600 | Amazon search |
| G34 | Stage 5 | Welding consumables (E70S-6 wire, discs) — shop welder assumed | 1 | ~$300 | Amazon search |
| Total | ~$29,340 |
Search links open a search for that spec; no listing chosen, no affiliate tags. Every BOM line includes a purchase link per standing order. Excludes welder, house slab, engineering and permits.