 Max Gibson
Robot Body: R2-D3 Dome Droid
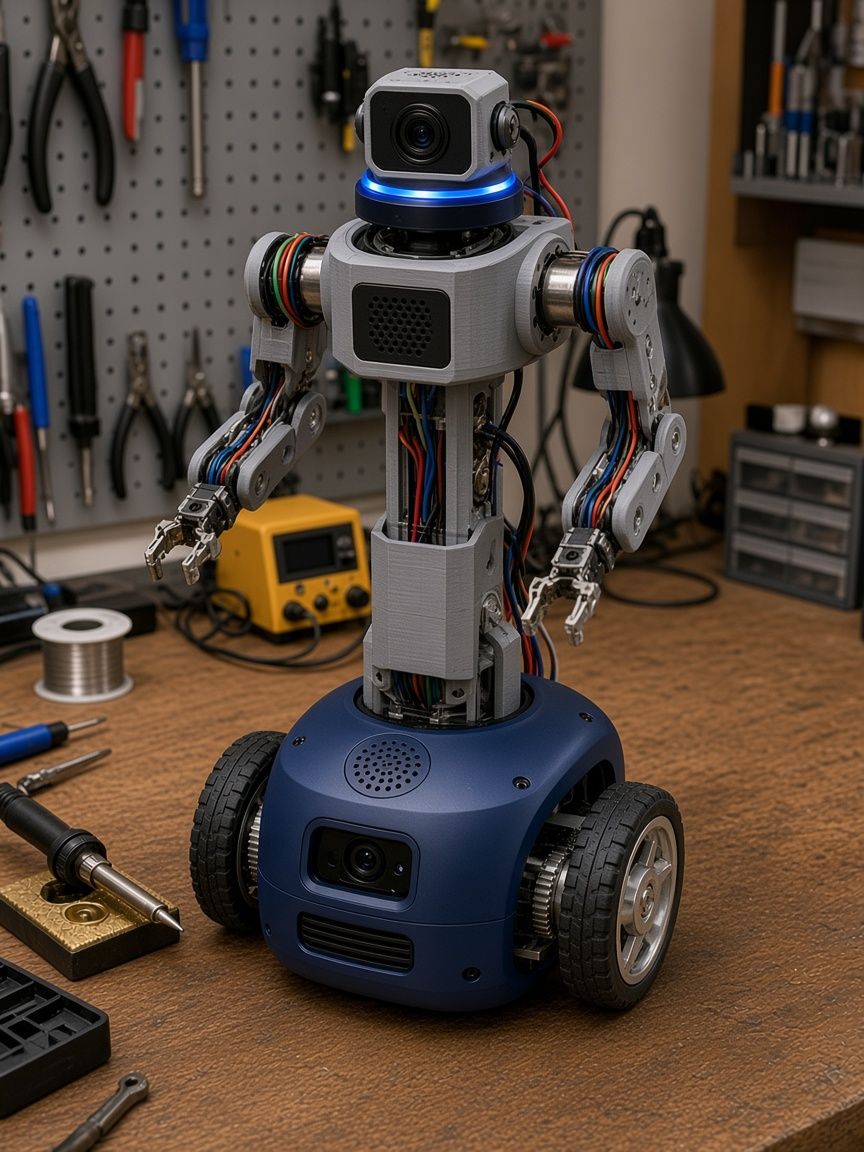
Concept assembly guide derived from the staged build plan. Not a certified engineering drawing. Prices are estimates (Oct 2026); nothing here is a purchase. Every step and every BOM line links to the part. Downloads: step-by-step PDF · BOM PDF · original brochure PDF · Stage 1 PDF · Stage 2 PDF · Stage 3 PDF · Stage 4 PDF · Stage 5 PDF
In stock (from video session)
Hardware Max already owns, from the Grok video session and earlier notes. Qty is shown only where known.
| Item | Qty |
|---|---|
| Raspberry Pi 4B (brain) | 1 |
| 10-inch capacitive touch panel (paired with Pi) | 1 |
| Second touchscreen (resistive, seen on video) | 1 |
| Second 10-inch mountable display | 1 |
| ESP32 dev boards | ≥2 |
| Solderless breadboard kit: breadboard, jumper wires, header pins | 1 kit |
| HC-SR04 ultrasonic sensor | ≥1 |
| PIR motion sensor | ≥1 |
| MQ-2 gas sensor | ≥1 |
| Moisture detection sensor | ≥1 |
| ADS7830 ADC board | 1 |
| Geekworm UPS board (model unverified) | 1 |
| Little motors (bin) | unknown |
| Potentiometers | unknown |
| 7-segment displays | unknown |
| Pixel displays | unknown |
| 555 timers / 8-pin ICs | unknown |
| Transistors / power transistors | unknown |
| Logic gates | unknown |
| Op amps | unknown |
| Small brass cylinder part (buzzer, motor or laser? TBC) | unknown |
| Soldering gear | 1 set |
| Low-wattage 2D laser etcher (labels and mounts only) | 1 |
Max says he already has some drive motors/servos, but none were identified on video (model and qty unknown). Stage 2/3 motor, servo, chassis, driver, LiPo, PCA9685, slip ring and UBEC lines stay as buys until Max sends photos or a list. Molicel cells and the exact Geekworm model are also unconfirmed.
Stage costs after owned parts: Stage 1 $70 · Stage 2 ~$253 · Stage 3 $124 · Stage 4 ~$116 · Stage 5 ~$640 (running ~$1,203).
Step-by-step build (one action per step)
Stage 1
- Flash Raspberry Pi OS onto the 64 GB robot microSD card.Part R4: 64 GB microSD (robot card) ×1 · $10 · Buy: Amazon search
- Insert the card into your Pi 4B.Part R4: 64 GB microSD (robot card) ×1 · $10 · Buy: Amazon search
- Connect the Camera Module 3 ribbon to the Pi CAM port (contacts toward HDMI).Part R1: Raspberry Pi Camera Module 3 ×1 · $25 · Buy: Raspberry Pi
- Plug the USB mic into a blue USB 3 port.Part R2: USB mini microphone ×1 · $15 · Buy: Amazon search
- Solder headers onto the MAX98357A amp board.Part R3: MAX98357A I2S amp + 3 W speaker ×1 · $10 · Buy: Adafruit
- Wire amp VIN/GND/BCLK/LRC/DIN to Pi pins 2, 6, 12, 35, 40.Part R3: MAX98357A I2S amp + 3 W speaker ×1 · $10 · Buy: Adafruit
- Screw the 3 W speaker leads into the amp terminals.Part R3: MAX98357A I2S amp + 3 W speaker ×1 · $10 · Buy: Adafruit
- Print the desk stand / dome in PETG.Part R6: PETG filament (desk stand / dome, ~$2 used) ×1 · $2 · Buy: Amazon search
- Mount the Pi 4B and 10-inch touchscreen on the stand.Part R6: PETG filament (desk stand / dome, ~$2 used) ×1 · $2 · Buy: Amazon search
- Plug in the 5.1V 3A supply and boot.Part R5: Pi 4 USB-C 5.1V 3A supply (if needed) ×1 · $8 · Buy: Raspberry Pi
- Run rpicam-hello and confirm the camera image.Part R1: Raspberry Pi Camera Module 3 ×1 · $25 · Buy: Raspberry Pi
- Record and play back a test clip to check mic and speaker.Part R2: USB mini microphone ×1 · $15 · Buy: Amazon search
Stage 2
- Assemble fuse, switch, XT60 and 5V 5A buck into the bench power harness.Part R13: Fuse, switch, XT60, 5V 5A buck ×1 · $30 · Buy: Amazon search
- Verify 5.1 V under a 4 A dummy load before any board sees it.Part R13: Fuse, switch, XT60, 5V 5A buck ×1 · $30 · Buy: Amazon search
- Mount the 3S pack and BMS on the nylon-standoff thermal break.Part R12: 3S 5000 mAh LiPo + BMS + nylon-standoff thermal break ×1 · $51 · Buy: Amazon search
- Print the motor mounts in PETG.Part R15: Wiring + PETG ×1 · $45 · Buy: Amazon search
- Bolt the two JGB37-520 motors into the mounts on the chassis.Part R7: Chassis + 2x JGB37-520 encoder gearmotors + wheels ×1 · $56 · Buy: Amazon search
- Press the wheels onto the motor shafts; fit the casters.Part R7: Chassis + 2x JGB37-520 encoder gearmotors + wheels ×1 · $56 · Buy: Amazon search
- Solder headers on the TB6612FNG and plug it onto the breadboard/perfboard.Part R8: TB6612FNG motor driver ×1 · $6 · Buy: Pololu
- Wire ESP32-S3 PWM/DIR pins to the TB6612FNG.Part R9: ESP32 dev board (OWNED, from video: at least 2 on hand) ×1 · $0 owned · Buy: Amazon search
- Connect motor leads and encoder wires; spin one motor and read encoder counts.Part R7: Chassis + 2x JGB37-520 encoder gearmotors + wheels ×1 · $56 · Buy: Amazon search
- Mount three HC-SR04P sensors front-left, front, front-right.Part R10: HC-SR04 ultrasonic sensor (OWNED: at least 1; buy only the shortfall to reach 3) ×3 (≥1 owned) · $0-6 · Buy: Amazon search
- Wire the MPU-6050 to the ESP32 I2C pins.Part R11: MPU-6050 IMU ×1 · $4 · Buy: Amazon search
- Link Pi to ESP32 over UART; pull the cable and confirm motors stop within 300 ms.Part R9: ESP32 dev board (OWNED, from video: at least 2 on hand) ×1 · $0 owned · Buy: Amazon search
- Balance-charge the 3S pack on the charger before first drive.Part R14: 6S-capable AC/DC balance charger (shared with drones) ×1 · $55 · Buy: Amazon search
Stage 3
- Cut and bolt the 2020 extrusion into the torso spine.Part R16: 2020 aluminum extrusion (torso) + printed shell ×1 · $40 · Buy: Amazon search
- Fasten the spine battery cradle to the extrusion.Part R22: Spine battery cradle + hardware ×1 · $16 · Buy: Amazon search
- Move the main pack from the deck into the spine cradle.Part R12: 3S 5000 mAh LiPo + BMS + nylon-standoff thermal break ×1 · $51 · Buy: Amazon search
- Mount the MG996R pan servo under the lazy-susan bearing.Part R17: MG996R pan servo on lazy-susan bearing ×1 · $12 · Buy: Amazon search
- Thread the head wiring through the slip ring.Part R18: MG90S tilt servo + slip ring ×1 · $17 · Buy: Amazon search
- Mount the MG90S tilt servo in the dome/head.Part R18: MG90S tilt servo + slip ring ×1 · $17 · Buy: Amazon search
- Bolt one MG996R shoulder servo on each side of the torso.Part R19: MG996R shoulder servos ×2 · $14 · Buy: Amazon search
- Wire all servos to the PCA9685 channels 0-3.Part R20: PCA9685 16-ch servo driver ×1 · $10 · Buy: Adafruit 815
- Feed the PCA9685 servo rail from the 6V 10A UBEC.Part R21: 6V 10A servo UBEC ×1 · $15 · Buy: Amazon search
- Clip the printed shell panels onto the torso.Part R16: 2020 aluminum extrusion (torso) + printed shell ×1 · $40 · Buy: Amazon search
Stage 4
- Insert two Molicel P28A cells into the X1200 (check polarity).Part R24: Molicel P28A 18650 cells (UNVERIFIED owned; still a buy) ×2 · $15 · Buy: 18650 Battery Store
- Stack the X1200 UPS board under the brain board.Part R23: Geekworm UPS board (OWNED, from video; exact model unverified) ×1 · $0 owned · Buy: Geekworm
- Replace the main battery lead with the XT90-S anti-spark pair + VBAT sense.Part R25: XT90-S anti-spark pair + VBAT sense lead ×1 · $8 · Buy: Amazon search
- Pull the main pack and confirm the brain stays on.Part R23: Geekworm UPS board (OWNED, from video; exact model unverified) ×1 · $0 owned · Buy: Geekworm
- (Optional) Swap in the Pi 5 2GB as brain; Pi 4 moves to drone ground station.Part R26: Raspberry Pi 5 2GB (optional brain upgrade) ×1 · $77.50 · Buy: Raspberry Pi
- (Optional) Press the Active Cooler onto the Pi 5.Part R27: Pi 5 Active Cooler ×1 · $5 · Buy: Raspberry Pi
- (Optional) Flash the second microSD for the Pi 5.Part R28: 64 GB microSD (second card) ×1 · $10 · Buy: Amazon search
Stage 5
- Mount the reSpeaker XVF3800 flat on top of the head.Part R29: reSpeaker XVF3800 mic array ×1 · +$46 · Buy: Amazon search
- Mount the LD19 lidar on the top deck; fit three VL53L1X ToF sensors.Part R30: LD19 lidar + 3x VL53L1X ToF ×1 · +$117 · Buy: Amazon search
- Swap in the Pololu 37D encoder motors.Part R31: Pololu 37D encoder motors ×2 · (in $135) · Buy: Pololu 4753
- Fit the Pololu wheels and hubs.Part R32: Pololu wheels / hubs ×1 · (in $135) · Buy: Pololu 2762
- Replace the TB6612 with the Cytron 10A driver.Part R33: Cytron 10A dual motor driver ×1 · (in $135) · Buy: Amazon search
- Install the Bioenno LiFePO4 pack and INA226 monitor in the spine.Part R34: Bioenno 12.8V LiFePO4 pack + INA226 ×1 · +$77 · Buy: Amazon search
- Upgrade arms to Feetech STS bus servos; add the BNO085 IMU.Part R35: BNO085 IMU + Feetech STS bus servos ×1 · +$95 · Buy: Amazon search
- Print the ASA outdoor shell; fit gaskets, E-stop and fan.Part R36: ASA shell, gaskets, wiring, E-stop, fan ×1 · +$170 · Buy: Amazon search
Add-on
- (Add-on) Plug the SIM7600G-H dongle into a USB port.Part R37: SIM7600G-H 4G dongle (add-on) ×1 · +$90 · Buy: Waveshare
- (Add-on) Install the A123 structural pouch pack after Stage 5.Part R38: 4S A123 pouch structural pack (add-on) ×1 · +$195 · Buy: Amazon search
Bill of materials
| ID | Stage | Part | Qty | Price | Buy |
|---|---|---|---|---|---|
| R1 | Stage 1 | Raspberry Pi Camera Module 3 | 1 | $25 | Raspberry Pi |
| R2 | Stage 1 | USB mini microphone | 1 | $15 | Amazon search |
| R3 | Stage 1 | MAX98357A I2S amp + 3 W speaker | 1 | $10 | Adafruit |
| R4 | Stage 1 | 64 GB microSD (robot card) | 1 | $10 | Amazon search |
| R5 | Stage 1 | Pi 4 USB-C 5.1V 3A supply (if needed) | 1 | $8 | Raspberry Pi |
| R6 | Stage 1 | PETG filament (desk stand / dome, ~$2 used) | 1 | $2 | Amazon search |
| R7 | Stage 2 | Chassis + 2x JGB37-520 encoder gearmotors + wheels | 1 | $56 | Amazon search UNVERIFIED: Max says he has some actuators but model/qty unknown; keep as a buy until photos or a list confirm. |
| R8 | Stage 2 | TB6612FNG motor driver | 1 | $6 | Pololu UNVERIFIED: Max says he has some actuators but model/qty unknown; keep as a buy until photos or a list confirm. |
| R9 | Stage 2 | ESP32 dev board (OWNED, from video: at least 2 on hand) | 1 | $0 owned | Amazon search In stock. Plain ESP32 works for motor PWM/encoders; S3 is optional. |
| R10 | Stage 2 | HC-SR04 ultrasonic sensor (OWNED: at least 1; buy only the shortfall to reach 3) | 3 (≥1 owned) | $0-6 | Amazon search Owned HC-SR04 is 5V: add a 1k/2k divider on ECHO for ESP32. Exact count unknown. |
| R11 | Stage 2 | MPU-6050 IMU | 1 | $4 | Amazon search |
| R12 | Stage 2 | 3S 5000 mAh LiPo + BMS + nylon-standoff thermal break | 1 | $51 | Amazon search UNVERIFIED: Max says he has some actuators but model/qty unknown; keep as a buy until photos or a list confirm. |
| R13 | Stage 2 | Fuse, switch, XT60, 5V 5A buck | 1 | $30 | Amazon search |
| R14 | Stage 2 | 6S-capable AC/DC balance charger (shared with drones) | 1 | $55 | Amazon search |
| R15 | Stage 2 | Wiring + PETG | 1 | $45 | Amazon search |
| R16 | Stage 3 | 2020 aluminum extrusion (torso) + printed shell | 1 | $40 | Amazon search |
| R17 | Stage 3 | MG996R pan servo on lazy-susan bearing | 1 | $12 | Amazon search UNVERIFIED: Max says he has some actuators but model/qty unknown; keep as a buy until photos or a list confirm. |
| R18 | Stage 3 | MG90S tilt servo + slip ring | 1 | $17 | Amazon search UNVERIFIED: Max says he has some actuators but model/qty unknown; keep as a buy until photos or a list confirm. |
| R19 | Stage 3 | MG996R shoulder servos | 2 | $14 | Amazon search UNVERIFIED: Max says he has some actuators but model/qty unknown; keep as a buy until photos or a list confirm. |
| R20 | Stage 3 | PCA9685 16-ch servo driver | 1 | $10 | Adafruit 815 UNVERIFIED: Max says he has some actuators but model/qty unknown; keep as a buy until photos or a list confirm. |
| R21 | Stage 3 | 6V 10A servo UBEC | 1 | $15 | Amazon search UNVERIFIED: Max says he has some actuators but model/qty unknown; keep as a buy until photos or a list confirm. |
| R22 | Stage 3 | Spine battery cradle + hardware | 1 | $16 | Amazon search |
| R23 | Stage 4 | Geekworm UPS board (OWNED, from video; exact model unverified) | 1 | $0 owned | Geekworm Owned Geekworm UPS. Confirm it is the X1200 (Pi 5) vs a Pi 4 model before Stage 4. |
| R24 | Stage 4 | Molicel P28A 18650 cells (UNVERIFIED owned; still a buy) | 2 | $15 | 18650 Battery Store |
| R25 | Stage 4 | XT90-S anti-spark pair + VBAT sense lead | 1 | $8 | Amazon search |
| R26 | Stage 4 | Raspberry Pi 5 2GB (optional brain upgrade) | 1 | $77.50 | Raspberry Pi |
| R27 | Stage 4 | Pi 5 Active Cooler | 1 | $5 | Raspberry Pi |
| R28 | Stage 4 | 64 GB microSD (second card) | 1 | $10 | Amazon search |
| R29 | Stage 5 | reSpeaker XVF3800 mic array | 1 | +$46 | Amazon search |
| R30 | Stage 5 | LD19 lidar + 3x VL53L1X ToF | 1 | +$117 | Amazon search |
| R31 | Stage 5 | Pololu 37D encoder motors | 2 | (in $135) | Pololu 4753 |
| R32 | Stage 5 | Pololu wheels / hubs | 1 | (in $135) | Pololu 2762 |
| R33 | Stage 5 | Cytron 10A dual motor driver | 1 | (in $135) | Amazon search |
| R34 | Stage 5 | Bioenno 12.8V LiFePO4 pack + INA226 | 1 | +$77 | Amazon search |
| R35 | Stage 5 | BNO085 IMU + Feetech STS bus servos | 1 | +$95 | Amazon search |
| R36 | Stage 5 | ASA shell, gaskets, wiring, E-stop, fan | 1 | +$170 | Amazon search |
| R37 | Add-on | SIM7600G-H 4G dongle (add-on) | 1 | +$90 | Waveshare |
| R38 | Add-on | 4S A123 pouch structural pack (add-on) | 1 | +$195 | Amazon search |
"Amazon search" links open a search for that exact part spec; no listing has been chosen and no affiliate tag is used. Nothing has been purchased.